
Installing tile on an outdoor concrete patio may seem simple. But there are a lot of things to consider if you want perfect results and no cracked tiles or crumbling grout in your future. Patio slabs are never level, and properly done patios larger than 6×6-ft or so are poured in multiple sections with expansion joints in between the individual slabs to account for expansion and contraction from daily heating and cooling.
If you don’t think carefully about thermal expansion or take the time to prep a level surface, then your tiled patio will be uneven with wavy grout lines and will also likely crack into pieces eventually. Want to prevent these problems for YOUR patio makeover? Then read on for tips!
Patio Tile Challenges: Weather, Water, and Steps
These clients had an outdoor patio space that was basic 1990s builder grade. It was made of two large slabs of bare concrete with one expansion joint gap running roughly down the middle.


You can see a puddle in the middle of one slab. This was actually moisture left over from a typically Austin foggy fall morning, pooled in a slight depression.
Concrete patio slabs are rarely completely level, and this was no exception. Also, concrete is great at absorbing and holding moisture both from the air above and the ground below. And finally, even covered concrete will expand and contract significantly from daily heating, nighttime cooling, and the occasional hard freeze.
All this makes a proper ceramic tile install challenging. Tile is not waterproof. So, just slapping tile down directly on concrete will trap moisture and cause cracking at every hard freeze. Ceramic and porcelain tiles also expand and contract at different rates than concrete when heated and cooled. This can cause summer cracking too.
If you just slap ceramic tiles down directly on an outdoor concrete pad, then you’ll get cracks with every big temperature swing.


There was an additional challenge with this project. The clients chose a very strongly patterned tile that needed to run the tile up and over a set of offset patio steps. It takes some careful planning to figure out a patterned tile layout that looks good on steps, is centered on the overall space, doesn’t cover expansion joints, and also minimizes tiny tile pieces around a patio perimeter.
Simple? Nope. Impossible? Not at all. Read on for why and how!
The Steps: Clean, Isolate, Install, and Grout
Before doing anything, we took an hour or so to play around with some potential tile layout patterns to decide what would look best when combined with the stairs and expansion joint without resulting in tiny slivers of tile along the patio perimeter.
DO NOT SKIP this design step when planning a patterned floor tile layout, and DO EXPERIMENT with different layouts using the actual tile you’re wanting. There is also no substitute for using the actual tile for layout planning. There are times when a certain tile simply won’t work well for a specific space. You’d be very unhappy to discover this after you’ve already started setting tile in stone.
STEP ONE: Scrub and Clean
Bare concrete needs to be completely clean for good thinset adhesion. Any dirt, oil, paint residue, bird crap, etc will cause problems. The best option for cleaning an outdoor patio slab is Trisodium Phosphate, commonly called TSP. It’s a powdered alkaline chemical that makes a very strong caustic cleaner when dissolved in water. It’s also very corrosive, so you’ll want to wear a good pair of rubber gloves and be mindful of where the runoff will go.
In this case, there weren’t any landscaping plants around the patio perimeter and the patio didn’t drain to a storm sewer. So it was a no-brainer to simply mop the patio with a strong TSP solution, scrub with a stiff broom, and then rinse. This patio was pretty grungy so needed a few rounds of cleaning, but was nevertheless ready for thinset within an hour.
You don’t need to wait for the concrete to dry before starting with thinset, since some added moisture actually helps make a tighter bond. The concrete pad simply needs to be really well rinsed to remove the TSP you just used to get rid of any surface dirt or oil.
STEP TWO: Crack Isolation Membrane
There are a couple ways to help prevent tile from cracking on an outdoor patio slab. My preferred method is to use a crack isolation membrane to decouple the tile from the slab and also eliminate moisture problems. The gold standard for this Schulter Ditra. It is a wonderfully engineered product that prevents outdoor tile from cracking in just about any use case. It costs $1.50/ft2 but more than pays for itself with peace of mind.
Seriously, it’s a great product and worth the investment for a guaranteed lifetime crack-free outdoor tile install project.


It’s also simple to install, so long as you follow the directions and take care to get complete coverage for good adhesion. There’s no need to pay extra for ‘premium’ unmodified thinset. Just the least expensive thinset mix will do, since it’s the membrane itself that provides the crack prevention performance.
Ditra membrane comes rolled in 3-ft wide sheets. Just precut to fit, use a 1/8-in or smaller V-notch trowel to evenly spread pretty thinly mixed thinset over a not-too-big area, and then lay the sheets in place and stomp all over each square inch to lock it in place. Using gray thinset will help since it’ll show through the Ditra membrane. If there are any light spots, then just stomp on ’em until you can see the grey shade showing through. It’s a good cardio dance workout.

In this case I actually used a 1/4-in square notch trowel because the concrete slabs had a pretty wavy surface. And, instead of stomping on the Ditra directly I instead used some pieces of scrap drywall to distribute the stomping pressure a bit.
This resulted in a much more level final surface for the tile install. You’re welcome for the tip!
STEP THREE: Tile
The trick for straight tile lines on a relatively large and irregularly shaped floor is, once again, careful preplanning.
In this case the main priority was not to cover the expansion joint between the two concrete patio slabs. Don’t tile over expansion joints. You’ll get cracked tiles as a result. The complication on this project? The expansion joint wasn’t actually straight or centered, nor were the slab dimensions square.


Using a simple laser straightline makes it possible to balance all of these irregularities and still achieve a perfect result. Once the main centerlines are carefully set and marked (I like using a big chunky magic marker for this), installing the rest of the field tile is relatively easy.


For this install of 6×6-in tile with 1/8-in grout joints, I used a 3/8-in square notched trowel for plenty of room to float each tile flat to its neighbors. This resulted in two flat tile planes each sloping slightly away from the expansion joint.
The patio would now shed water evenly and effectively. This eliminated the shallow puddles that used to collect on the concrete pad surface.


One edge of the patio was curved, so installing the perimeter tile took some careful cutting. Also, wrapping the tile pattern over the patio stairs required some finagling since concrete steps are rarely level or square. Again, extra thinset is your friend for leveling tile on irregular surfaces.


You can also use thinset as a cheap stucco for dressing up otherwise bare concrete with a nice even scratchcoat finish.


The complex tile pattern also required some foresight for preventing trip injuries. You DO NOT want patterned tile to hide the fact that THERE ARE STAIRS!
So, here’s a trick. Make the pattern seem continuous from just one vantage point.


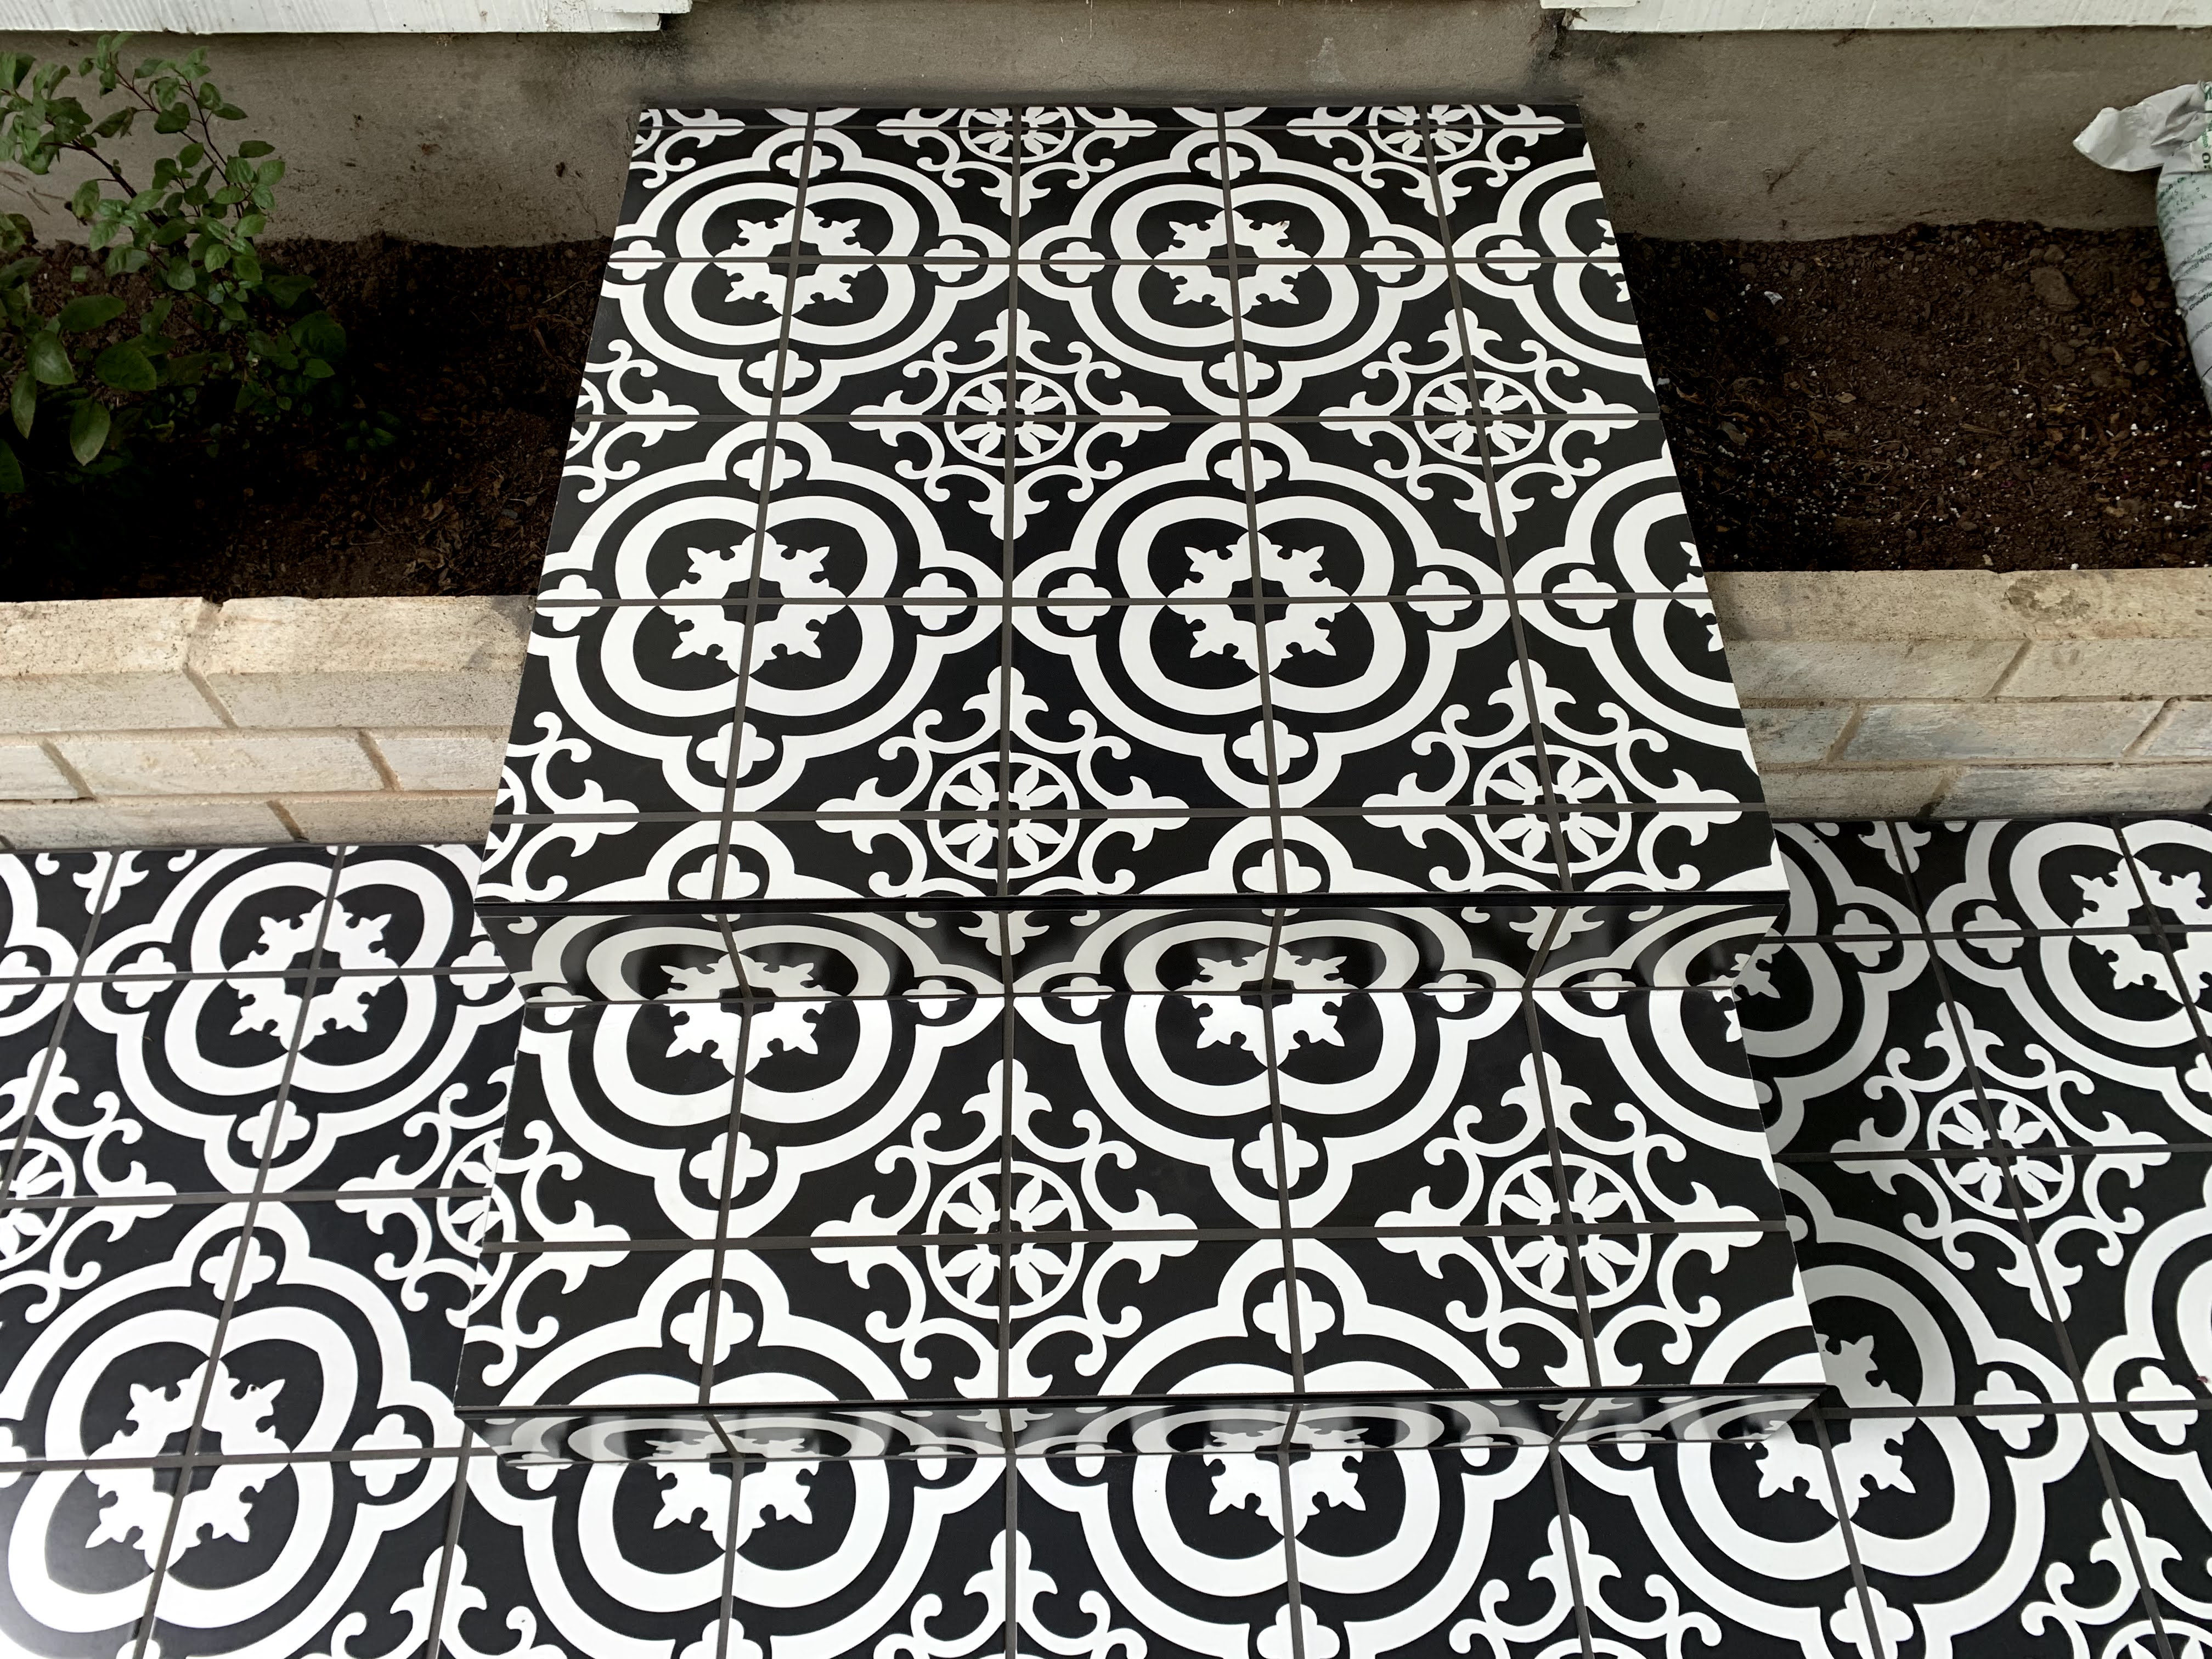
See the optical trick? When you’re viewing the stairs from a distance, it looks like one continuous pattern. But as you get closer to the stairs, you can see the pattern breaks.
This is a stylish way to help prevent folks from tripping on tiled patio steps. Seriously, think about the home insurance liability ramifications of wrapping your steps in patterned tile that makes them seem to disappear when looking directly from above.
STEP FOUR: Grout
There are many different grout types to choose from. For outdoor patio tile, the main considerations are: color fade resistance, stain resistance, water resistance, and ease of install. Even covered patios will see significant sunlight, and you don’t want your patio grout to sunbleach over time like a cheap rug. You also don’t want the grout to be a nightmare to keep clean year after year.
The clients chose a very dark grey color to complement the tile, so this greatly simplified the grout choice. This color wears great outdoors and doesn’t easily show dirt or stains.
Normally I would use epoxy grout for an outdoor patio. But this tile had a matte no-slip surface finish that would have made epoxy haze very difficult to remove. Epoxy grout is also quite expensive and would have popped the client’s budget. So, I instead used Mapei Ultracolor Plus for all the advantages of regular sanded grout (relatively inexpensive, forgiving workability, easy release from tile surfaces) with added water resistance and color consistency.
No matter what grout you use for a patio, be sure to plan your install carefully. DO NOT install outside grout in direct sunlight (it will dry way too quick) or over multiple days (which can result in shade variations). Instead, grout all the tile in one day working in shade the entire time. In this case, I started on one shaded side of the patio in the morning and then did the other side once the shade flipped in the afternoon.
Finally, there are two choices for properly filling outside patio tile expansion joints. You can use fancy PVC or metal joint profiles which look spiffy but can be pretty pricey. You can also fill expansion joint lines with color-matched grout caulk for the same result at a much lower cost. These folks chose the caulk option for added cost savings.
The Result? Judge for Yourself!
The clients were very happy with the final finish, and a year later it’s still crack free and looking good.


